
This is where you manage your Inventory sites. School Sites are initially set up and licensed under System Management: Licensing and will be listed automatically.
ID for School Sites is established in Licensing and cannot be edited here.
The Licensed box will be pre-checked if applicable; this cannot be modified in Inventory.
Check the Active box if this site is currently in use.
o If a site is active, that means it is currently available for inventory transactions and may have inventory on hand.
o Uncheck the box if the site is no longer active.
o Inactive sites (licensed or unlicensed) could be closed schools that were used in a prior year, or warehouse sites that are no longer needed. They must have no open inventory transactions and no inventory on hand.
Select a Site Type from the dropdown list. It is usually a school, but for Inventory it can also be the Primary Warehouse or an additional warehouse.
The Primary Warehouse is the warehouse that is used for automatic Warehouse Orders created from School Orders.
Any site can be designated as a warehouse but only one site can be the Primary Warehouse.
Any inventory item that is in the Primary warehouse and not already reserved for a delivery will be pulled if there is a school order for it.
Some school districts contract with a vendor to provide storage and shipping of warehouse items. In this case the Primary Warehouse is considered a Contract Warehouse.
If your Primary warehouse is a Contract Warehouse (where handling fees apply), you will need to select a Vendor as explained below.
NOTE: If you do not pay handling fees apply for Warehouse Deliveries, leave the Warehouse Vendor blank.
Other warehouses can be used as processing or storage sites.
Transactions (such as Receiving and Transfers) can be entered for these warehouses but there are no automatic transfers from school orders.
Example: if a commodity item is to be processed into another item, it can be received or transferred into a Processing warehouse until it is available for use in the cafeterias.
Enter a site or warehouse name in the Name field. This is the school or warehouse name that is used on screens and reports.
Enter a contact name to be used on Purchase Orders in the Contact Name field.
Enter the site’s address in the three Address fields provided for the Shipping Address. This information is used when purchase orders are printed.
Enter the phone number and manager’s email of the site in the Phone #/ Manager’s E-Mail fields. You can enter this information for reference purposes. It does not print on Purchase Orders.
Enter a route number in the Route # field if you want to use the Warehouse Load Report to summarize warehouse deliveries based on truck routes.
Select a site group from the Site Group dropdown list. Site Group changes will affect all Meals Plus products.
o If Site information is changed, it may overwrite the Site Address in other Meals Plus products.
Select an order preference for the site from the Order Preference dropdown list.
o Warehouse if available is the default option.
o Direct from Vendor is the default for the primary warehouse.
o A Primary Warehouse is required for a site to set to Warehouse Only.
Enter the billing information for this site. This will be printed on Purchase Orders.

![]() This is only required if you have a Contract Warehouse
and pay Handling Fees for warehouse deliveries.
This is only required if you have a Contract Warehouse
and pay Handling Fees for warehouse deliveries.
If you don’t have to pay handling fees for warehouse deliveries, leave the Warehouse Vendor blank.

The Vendor field is only available if the Primary Warehouse is selected.
o It is used when creating POs for Handling Fees for deliveries from the Contract Warehouse.
Select the Vendor that the handling fees are paid to.
The vendor must be mapped to a general ledger vendor in Vendor Setup.
Select users to be assigned to a specific site.

When you are finished, click Save.
Select items to be assigned to an ordering Site.
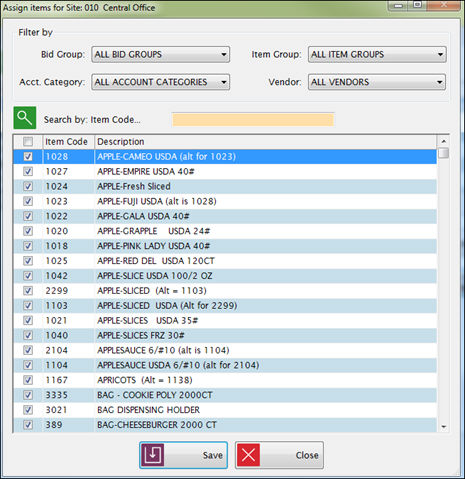
Select a bid group from the Bid Group dropdown list.
Select an item group from the Item Group dropdown list.
Select an account category from the Acct. Category dropdown list.
Select a vendor from the Vendor dropdown list.
When you are finished, click Save.