 What is a Cycle Menu?
This is where you create Cycle Menus and apply them to the school calendar.
What is a Cycle Menu?A Cycle Menu is a template for a standard sequence of daily menus that can be used repeatedly. It can be for any number of days, but usually is for a month or less.
With Meals Plus Menus, you can define any number of Cycle Menus and use the Weighed Analysis tool to ensure that the meals served are nutritionally balanced.
After you have created your cycle menus (templates) you can apply them to the cafeterias.
Multiple Cycle Menus can be applied to the same site, date and meal type.
This allows you to organize and balance cycle menu items for different serving lines.
Example: A cafeteria might have 3 serving lines, where line (1) one serves a regular plate lunch, line 2 is a salad bar and line 3 serves sandwiches. Each line can have a separate nutritionally balanced cycle menu.
For more information please see Apply Cycle Menu.
 Menus are created from Recipes.
You can select from the sample recipes provided or set up your own under Manage Recipes.
To place a single Ingredient on a menu, you need to convert it to a Recipe first.
o Please see Shortcuts on Ingredients Setup.
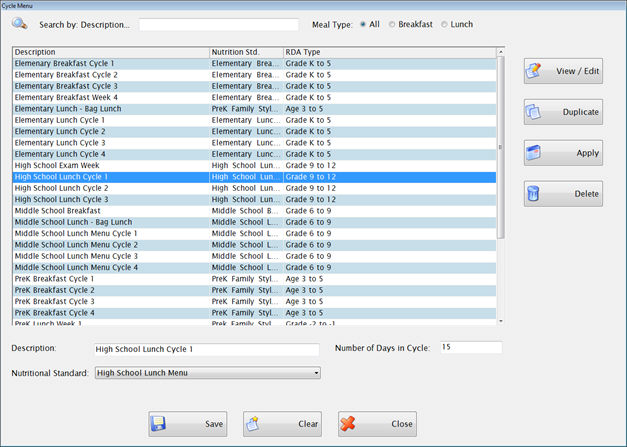
The grid shows all your existing Cycle Menus.
To view or edit an existing Cycle Menu, double-click the row in the grid or highlight it and click View/Edit.
On a clear screen, enter a Description and Number of Days for the cycle menu you want to create.
Select the Nutritional Standard from the dropdown list. (If you have not set up the Nutritional Standard for this menu yet, close this screen and set it up under Administration: Nutritional Standard.)
This is where you add the recipes and projected number of servings.

Click the blue arrows or use the green slider to browse through the days in the cycle to Select a day.
Enter the total number of reimbursable meals that you plan to serve that day in the Feeding Figure text field. This will be used in calculating the weighted analysis.
 This is for planning purposes only. You can use a representative or average number here; each school’s individual feeding figure will be used when the cycle menu is applied to the daily menu calendar.
Click the  button to add a new blank line to the menu grid.
Public Calendar is checked by default.
o This means that it will be listed on the calendar that is designed for public distribution. You can list up to 10 items on each day.
o Uncheck the box if you don’t want the item to be listed. For example, you could have a note in the news section that says “Assorted milk available daily” so you would not need to list it on every day’s public menu.
You can select a Recipe by Id or description from the Recipe Id and Recipe Description dropdown lists that appear when you click in that field.
o If you click in the Recipe field and type the first letter of the recipe, it will start the list at that position. When you select the recipe, it will fill in the Recipe ID and Size.
o Or if you know the Recipe ID, you can type it in under Rec.Id. Then press Tab and it will fill in the rest of the information.
Enter the number of servings planned for each meal in the Quantity text field.
The Serving Size from the recipe is displayed in the Size field.
o There are two editable boxes here: one for whole numbers and one for fractions. You can fill in either or both of them.
o If you change the sizing, it will affect the Weighted Analysis, Food-Based Analysis and Prep Report.
The A/R field indicates which menu items are reimbursable. The A/R dropdown gives you three choices:
o Reimb for reimbursable meal items, A la carte, and Adult. Only the reimbursable items will be used in the Weighted Analysis.
o If you have a recipe that is served for more than one type of meal, you will need a separate line for each.
Example: Beef Taco would need to be listed on 3 different lines if it is served for Reimb, Adult and AlaCarte.
Projected Servings is the number of servings that you plan on serving of this menu item.
o For Reimbursable items, this information in conjunction with the feeding figure will be used in the weighted analysis.
o For Adult and Alacarte items it is just for planning and production purposes.
To remove a menu item, highlight the row and click the  button.
Highlight a row and use the 
 arrows to move the item up or down.
Several options are available at the bottom of Cycle Menu Setup to help you create menus quickly and easily.

Click the  button to copy menu recipes to other days in the menu cycle.
o It will also copy the quantity, A/R type and projected servings.
o The Public Calendar setting will be copied for a maximum of (10) ten0 items per day.
Highlight the menu items that you would like to copy. To select multiple items, hold down the control key while you click with the mouse.
Click the Copy button. You will get a screen like this:
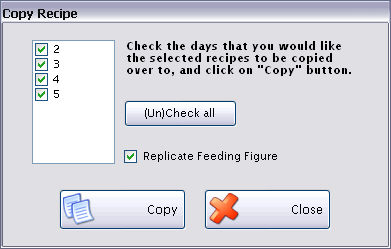
Check the days you want to copy the recipes to.
Check Replicate Feeding Figure if you want to use the same feeding figure every day.
Click Copy and it will add the recipes to the selected days.
Click the  button to search for recipes based on specific nutrient criteria or description text. This is on the Cycle Menu screen.
o The purpose of the function is to allow the you to find foods to use to update menus that do not meet the nutrient criteria required by USDA.
o You can search for recipe entries that meet certain nutrient criteria, such as foods high in vitamin C or low in fat. You are able to search for as many as fourteen nutrients at the same time and are able to print or display the report.
o There are different types of search criteria for finding recipes. Some of the types can be used in combination.
Recipe Tab
On the Recipe tab, you can search by Nutrient (NSMP) or Meal Component (FBMP), for all or part of a Recipe ID and/or Description text.

Example: Under the NSMP radio button, all recipes that use an ingredient with Apple in the description and more that 300 IU of Vitamin A:

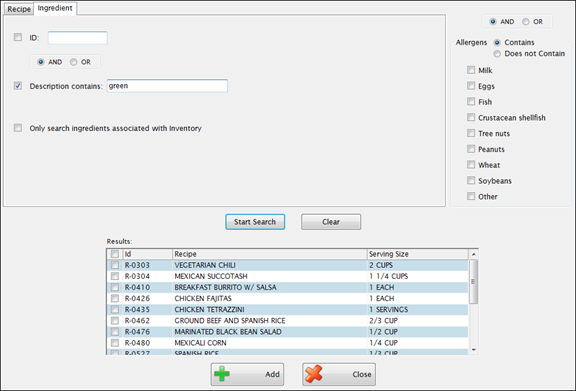
Ingredient Tab
On the Ingredient tab, you can search by ID and Description, and you can filter to show only Menus Ingredients that are associated with Inventory Items.
Example: In the screen shown below, it will find all recipes that use an ingredient with “apple” in the description have at least one ingredient that is associated with an Inventory Item.
Click  to search based the criteria you entered.
The Recipe Search Results will display. The results only display Active recipes.
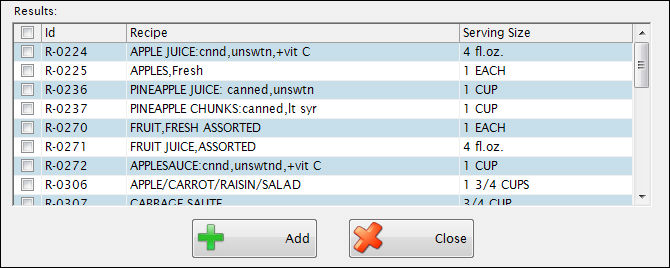
The results grid will display the recipes that meet the search criteria.
Check the box on the left to select a recipe, and then click Add to add it to the current day’s cycle menu.
Notes on Recipe Tab
You can filter the result set of the filtered ingredient to display recipes that are marked as Condiments. The recipe is defined as a condiment on the Manage Recipe > Recipe Info tab. This filter is in addition to other matched selected criteria.
Selecting the Include / Exclude radio button will include/exclude the selected allergen in the filter in the recipe search. The allergen filter applies to the entire recipe, not just the selected ingredient. This filter is in addition to other matched selected criteria.
To indicate that you want to filter on an allergen all you need to do is check the checkbox, doing that will filter on that allergen – regardless of that allergens additional information.
The  screen will give you a read-only view of the Recipe Information directly from the Cycle Menu screen. Please see Manage Recipes for an explanation of the Recipe screens.
Click 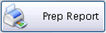 to print a Prep Report for the highlighted recipes directly from the Cycle Menu screen, using the Projected Servings and Serving Sizes from the menu.
This tab gives you a “snapshot” of all the days within the cycle.

In the cycle menu planning stage, this view gives a snapshot of what foods are being served on each day so you can ensure variety and pleasant plate color presentation while meeting the nutritional requirements.
Since it is intended as a quick overview, It will only show the name of the recipe, with no details about recipe Id, number of servings or whether it is a reimbursable meal or not.
The  button is available on the Cycle Menu screen and also on the School Daily Menu if your menu is using the NSMP Nutritional Standard.
 What is Weighted Analysis?
When a selective menu is planned (with more than one food choice), some food items are more popular than others; therefore, appropriate “weighting” is given to the most popular food item.
A menu item that is chosen frequently will contribute more nutrients to the meal than a menu item seldom chosen.
All the items being served are added together and then divided by the Feeding Figure to calculate the nutrients per meal.
Only menu items marked as reimbursable will be included in the weighted analysis.
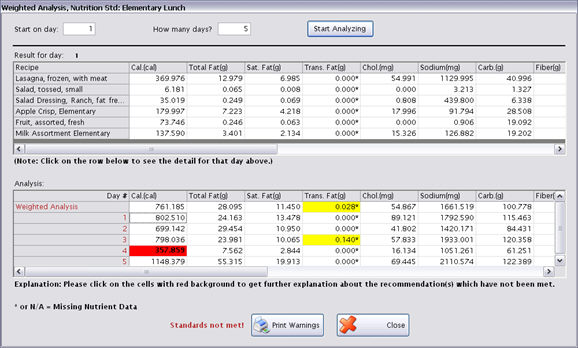
Enter which day of the cycle menu that you want to begin analysis with in the Start on day text field. You can start with any day.
Enter the number of days you want to analyze in the How many days? text field. For NSMP, you can analyze from one to 7 days.
Click Start Analyzing to run the weighted analysis.
There are two results grids:
o The upper grid shows all the recipes used and the per-serving nutrients for each one. You can click on any day in the lower grid to see the recipes for that day in the upper grid.
o The lower grid gives the Weighted Analysis results. There is one row per day plus a summary in the top row. If standards are not met for a day and/or summary, the Day# and Weighted analysis captions will be shown in red font.
Any USDA or local standards that are not met will be highlighted. A red background is used for USDA standards, and yellow for local standards. If you click on the highlighted fields, you will get an explanation of the standards not met.
o You will also get this warning message on the screen: 
In the following example, there are not enough calories on day 4 to meet USDA requirement, but the overall 5-day analysis does meet the standard.
The locally-defined TransFat requirement is not met for day 3 or for overall results.
You can use the horizontal slider to scroll to the right to see why the other days are shown in red font.

Click 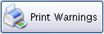 if you want to print a report that shows the standards not met.
The report will print one page for each day, with a summary page if the analysis spans multiple days. Nutrients that do not meet the RDA or User Defined standard will have a border around them.
The 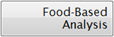 button is available on the Cycle Menu screen and also on the School Daily Menu if your menu is based on FBMP Nutritional Standards.
 What is Food-Based Analysis?
In food-based analysis, the menu is analyzed based on the food components offered.
There are daily requirements for breakfast and lunch, and additional weekly requirements that apply to lunch only.
The components are entered on the Recipe Info tab under Manage Recipes.
NOTE:Food-Based Analysis has not yet been evaluated or approved by USDA.
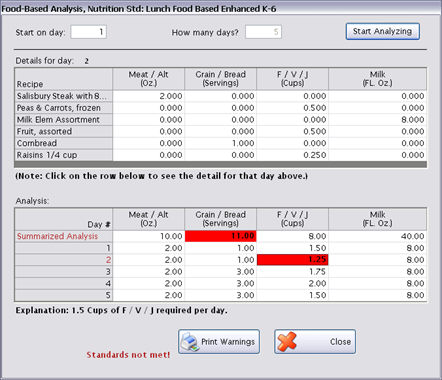
Enter which day of the cycle menu that you want to begin analysis with in the Start on day text field. You can start with any day.
Food-based analysis is always 5 days, due to the weekly requirements that apply and will display in the How many days? text field.
Click Start Analyzing to run the weighted analysis.
There are two results grids
o The upper grid shows all the recipes used and the meal components provided by each one. You can click on any day in the lower grid to see the recipes for that day in the upper grid.
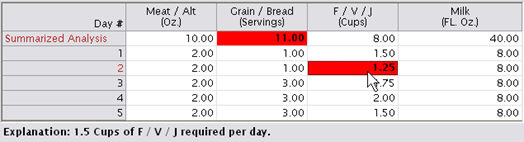
o The lower grid gives the Food-Based Analysis results. There is one row per day plus a summary in the top row. If standards are not met for a day and/or summary, the Day# and Summarized Analysis captions will be shown in red font.
o Any standards that are not met will be highlighted with a red background. If you click on the highlighted fields, you will get an explanation of the standards not met.
o You will also get this warning message on the screen: 
Example: The minimum daily requirement for 1.5 cups of Fruit/Veg/Juice is not met on day 2. But the weekly requirement is met since the summary line is not highlighted.
The Grain/Bread requirement is met for each day, but the weekly amount does not meet the additional requirement of 12 servings per week.
Click  if you want to print a report that shows the standards not met.
The report will print one page for each day, with a summary page if the analysis spans multiple days. Components that do not meet the standard will have a border around them.
The  button is available on the Cycle Menu screen and also on the School Daily Menu if your menu is based on FBMP Final Rule.
 What is 6 Cents Analysis?
The Final Rule 6 Cents Analysis of a Reimbursable Meal uses 100% for the ratio projected/feeding figure regardless of what the user has entered. The user will need to key in a value for use in production record, inventory updates, order forecasting, etc. The USDA wants to know the Meal Component values that are offered on the Menu.
Check the necessary boxes in the 6 Cents grid column to define what items from the cycle make up a non-weighted single reimbursable meal.
Click the 6 Cents Analysis button to do an analysis of a non-weighted single reimbursable menu.
 ·
·
Enter the start day of the cycle menu analysis in the Start on day text field (i.e., 1= Monday, 2= Tuesday, etc.). You can start with any day.
Due to the weekly requirements that apply for 6 Cents analysis, the How many days? text field is read-only and will display as 5.
Click the Start Analyzing button to run the weighted analysis.
There are two results grids:
o The upper grid shows all the recipes used and the Meal Components provided by each one. You can click on any day in the lower grid to see the recipes for that day in the upper grid.
o The lower grid gives the 6 Cents Analysis results. There is one row per day plus a summary in the top row. If standards are not met for a day and/or summary, the Day# and Summarized Analysis captions will be shown in red font.
o Any standards that are not met will be highlighted with a red background. If you click on the highlighted fields, you will get an explanation of the standards not met.
o You will also get this warning message on the screen: 
Click  if you want to print a report that shows the standards not met.
The report will print one page for each day, with a summary page if the analysis spans multiple days. Components that do not meet the standard will have a border around them.
If you would like to copy a cycle menu, click  .
.
Example: If you have already created an Elementary Lunch cycle and now need a High school Lunch cycle, you can copy the first one and then analyze it based on a different Nutritional Standard.
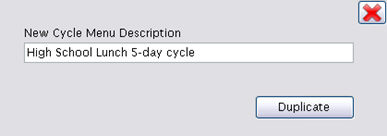
Enter a Description for the new cycle menu.
Click Duplicate to save the new cycle.
To apply a different Nutritional Standard:
o Highlight the new cycle menu in the upper grid.
o Select the new standard from the dropdown and click Save.

On the duplicated menu, none of the menu items will be checked for display on the Public Calendar.
When you have created menus for all the days in the cycle, you are ready to  the cycle menu to the school calendar. This is done from the Cycle Menu screen.
The menu will be applied to the selected sites, using each site’s Feeding Figure in Site Setup.

Select the school calendar you are using from the School Calendar dropdown list.
Select the starting and ending dates for this cycle from the Start/End Dates fields.
Select Site Group or Site from the Apply by section.
o If you select Site Group, you can apply the menu to an entire site group at once.
o If you select Site, you will check the boxes for the individual schools.
Click Apply when you have made all the required entries.
If the selected Cycle Menu has already been applied to a selected school and date, you will get a warning message:

You can either overwrite the existing menus or cancel the changes.
You can have multiple cycle menus for the for the same school, date and meal type. This may be useful in cafeterias with multiple serving lines that serve different types of menu items.
Example: There could be one line that serves the regular cycle menu and an additional cycle menu for a sandwich line.
The method to apply them remains the same - you highlight the desired cycle menu and then click Apply.
This will display the Apply cycle menu dialog box; make your selections to define where and when you want to use this cycle menu to create the related School Daily Menu.
Repeat the Apply process until you have applied all the cycle menus that you want for that site, date and meal type.