 This option is only available if you are licensed to use Meals Plus Production. If you would like to obtain a license, please contact Meals Plus Support.
 This option is only available if you are licensed to use Meals Plus Production. If you would like to obtain a license, please contact Meals Plus Support.
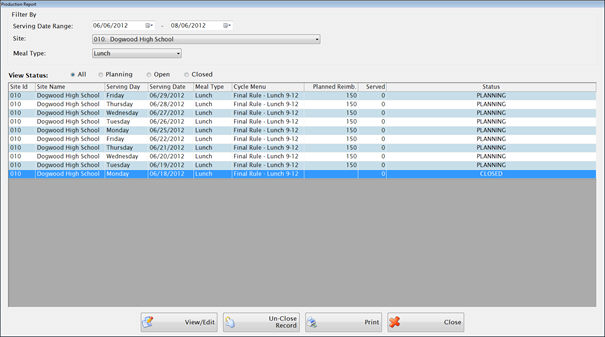
When you first open the screen, it will display all the available production records within one month (past or future) of today.
o You can use the Date Range, Site and Meal Type and Status filters to reset the section.
o You will only have access to the sites that you have rights to in System Management: User Setup: Production.
Highlight a row and click View/Edit to view or edit that Production Report.
 What’s the difference between Menu Planning and Production Planning?
Menu Planning consists of planning and analyzing a cycle menu, and applying it to the school calendar as a School Daily Menu. This may take place well in advance of the serving day.
Production Planning would be done closer to the time the meal is going to be served. Any menu additions or substitutions would be incorporated and you could also change the planned number of servings at this point.
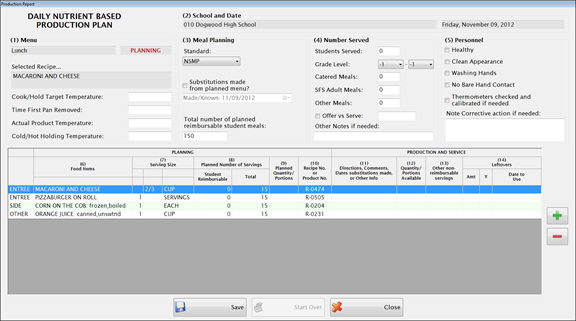
When you open the Production Record, much of the information is automatically filled in from School Daily Menu. The other information can be filled in after the meals are served.
There are 14 sections on the Production Report.
Please see below for details.
 If you would like to print out a working copy of the Production report, just Save (and then choose Save Only) to set the status to Open. Then the Print button will be enabled but you can still edit.
This is the Production Report header section that has the basic information for this School and Date.
Many of the fields are automatically filled in from the School Daily Menu.
Meal Type
This is filled in automatically from the Nutritional Standard used for the School Daily Menu.
Status
PLANNING means that the School Daily Menu has been created but it has not been saved under Production yet.
OPEN means that the Production Record has been edited from the School Daily Menu information and the changes have been saved. You are retrieving the saved Production data, not the data from the School Daily Menu.
o OPEN records can be edited and saved as many times as needed.
o If you want to clear all changes and go back to the School Daily Menu information, click Start Over.
CLOSED means it has been completely finished. No more changes are allowed.
Select Recipe
The name of the recipe highlighted in the lower grid will automatically populate this field.
Temperature and Time information
In this section you can enter the production temperatures and times for any recipe on the day’s menu. Enter this information when the meal is actually served. It should be completed for all menu items that are potentially hazardous.
To select a recipe, highlight that item in the grid in section 6.
o Enter the proper cooking or cold-holding temperature. It will be filled in automatically if it was entered with the recipe in the Cook/Hold Target Temp text field.
o Enter time removed from oven or refrigerator in the Time First Pan Removed text field.
o Enter the product temperature after cooking to reach the target temperature in the Actual Product Temperature text field.
o Enter actual temperature of the food when it is removed from the cooler or hot holding cabinet in the Cold/Hot Holding Temperature text field.
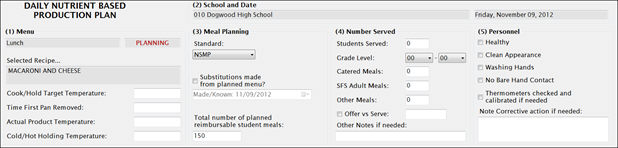
This automatically filled in from the School Daily Menu.
You can enter or edit the information for the following fields:
Standard is the Nutritional Standard from the School Daily Menu
Enter if and when substitutions were made to the planned menu in the Substitutions made from Planned Menu text field.
Total number of planned reimbursable student meals the Feeding Figure from the School Daily Menu.
Complete this after the meal is served.
Select the grade level for the students from Grade Level text field.
Enter the total student meals served in the Students Served text field.
Enter the number of catered meals in the Catered Meals text field.
Enter the number of child nutrition meals in the SFS Adult Meals text field.
Enter the number of other adult meals in the Other Adult Meals text field.
Check the Offer vs Serve box if you have an Offer vs Serve and enter the grades where it is used (example: KI - 05).
Enter any notes in the Other Notes if needed text box.
Check the items that apply to the personnel.
Enter notes on any Corrective actions taken in the text box.
These instructions are for Nutrient Based only.

The planned daily menu items are listed but you can add and remove items if the menu has changed.
The order of the recipes is determined by the Recipes Group and Category value.
The display order is ENTRÉE, SIDE, OTHER, CONDIMENTS and MILK.
To add an item, click the green plus button and use the Search Recipe screen to locate the recipe. Click Add Recipe to add it to the Production Report.
To remove an item, highlight that row on the Production Report and click the red minus button.
The Qty will be pre-filled from the School Daily Menu. (If you add a new item it will default to 1.)
The Size is the Serving Size defined in the Recipe
Student Reimbursable is the number of planned reimbursable servings from the School Daily Menu.
Total includes Reimbursable, Alacarte and Adult servings.
These values can be modified. If you add a new item, you will need to enter the planned number of servings.
Enter the planned quantity/portions required to prepare the planned Total servings in section 8. (Examples: 24 Lbs, 3 #10 cans, etc.)
This is where you enter your Production and Service records for the meal when it is actually served.
Sections 11 – 14 in the Nutrient Based Production Report are similar to Sections 13-16 on the Food Based Production Report.
You can use this column for recording any special directions or additional information relative to production and preparation.
Enter the quantity of each item that was actually prepared. Include foods that were left over from previous days as well as additional food opened or prepared. Use purchase units (i.e. pounds, #10 cans, etc.).
Enter the number of portions served for non-reimbursable meals.
Record the following in accordance with HACCP and local guidelines.
Enter the actual number of portions left (even if you are discarding the food) in the Amount field.
Enter the actual temperature of the leftover in the oF field.
Enter the date the leftovers need to be used by in the Date to Use field.
When you open the Production Record, much of the information is automatically filled in from School Daily Menu. The other information can be filled in after the meals are served.
There are 16 sections on the Production Report.
Please see below for details.
 If you would like to print out a working copy of the Production report, just Save (and then choose Save Only) to set the status to Open. Then the Print button will be enabled but you can still edit.
This is the Production Report header section that has the basic information for this School and Date.
Many of the fields are automatically filled in from the School Daily Menu.
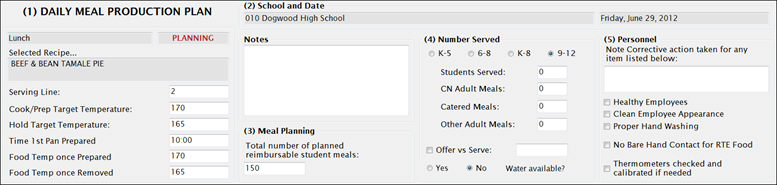
Meal Type
This is filled in automatically from the Nutritional Standard used for the School Daily Menu.
Status
PLANNING means that the School Daily Menu has been created but it has not been saved under Production yet.
OPEN means that the Production Record has been edited from the School Daily Menu information and the changes have been saved. You are retrieving the saved Production data, not the data from the School Daily Menu.
o OPEN records can be edited and saved as many times as needed.
o If you want to clear all changes and go back to the School Daily Menu information, click Start Over.
CLOSED means it has been completely finished. No more changes are allowed.
Select Recipe
The name of the recipe highlighted in the lower grid will automatically populate this field.
Temperature and Time information
In this section you can enter the serving line number, production temperatures and times for any recipe on the day’s menu. Enter this information when the meal is actually served. It should be completed for all menu items that are potentially hazardous.
To select a recipe, highlight that item in the grid in section 6.
o Enter the serving line number in the Serving Line text field.
o Enter the proper cooking temperature in the Cook/Prep Target Temp text field. It will be filled in automatically if it was entered with the recipe.
o Enter the cold-holding temperature for the recipe in the Hold Target Temperature text field.
o Enter time removed from oven or refrigerator in the Time 1st Pan Removed text field.
o Enter the product temperature after cooking to reach the target temperature in the Food Temp Once Prepared text field.
o Enter actual temperature of the food when it is removed from the cooler or hot holding cabinet in the Food Temp Once Removed text field.
This automatically filled in from the School Daily Menu.
Enter any Notes about the recipe in the text box above Meal Planning.
The Total number of planned reimbursable student meals will be automatically populated based on the Feeding Figure from the School Daily Menu.
Complete this after the meal is served.
Select K-5, 6-8, K-8 or 9-12 for the grade level for the students.
Enter the total student meals served in the Students Served text field.
Enter the number of catered meals in the Catered Meals text field.
Enter the number of child nutrition meals in the CN Adult Meals text field.
Enter the number of other adult meals in the Other Adult Meals text field.
Check the Offer vs Serve box if you have an Offer vs Serve and enter the grades where it is used (example: KI - 05).
Select Yes or No if Water Available?
Enter notes on any Corrective actions taken in the text box.
Check the items that apply to the personnel.
These instructions are for Food Based only.

This is already filled in from the School Daily Menu.
The planned daily menu items are listed but you can add and remove items if the menu has changed.
The order of the recipes is determined by the Recipes Group and Category value.
The display order is ENTRÉE, SIDE, OTHER, CONDIMENTS and MILK.
To add an item, click the green plus button and use the Search Recipe screen to locate the recipe. Click Add Recipe to add it to the Production Report.
To remove an item, highlight that row on the Production Report and click the red minus button.
The first column is Quantity and will be pre-filled from the School Daily Menu. (If you add a new item it will default to 1.)
The second column is the Portion Size and is the Serving Size defined in the recipe.
The third column is the measurement type is defined in the recipe.
This information comes from the School Daily Menu and Recipes.
The Meal Pattern Contribution is the Meal Component value defined in the Recipe. (The Recipe No. is in Column 1).
This column reports how much food it will take to make 100 servings of this item’s Meal Component. It does not show what the ingredient is, just how much of the ingredient is used to make the Meal component.
This is calculated from the current Recipe and is read-only.
These three Recipe details must all be entered for column 8 to be calculated correctly:
Number of Servings from the Recipe
Meal Component on the Recipe Info tab
Meal Component on the Recipe Ingredients tab
This Planned No or Number of Servings for Student Reimbursable and Total numbers come from the School Daily Menu. The values can be modified.
If a item is listed more than once (because it provides more than one component), the total Planned Number of Servings for that item is summarized and filled in only on the first listing.
This is because the Total numbers are used to calculate and update Inventory Usage. You do not need to fill in values for the duplicate menu items.
This is like column 8 but it for the initial Total number of servings.
You can edit this field.
This field does not automatically adjust based on the data in the column 10.
This is where you enter your Production and Service records for the meal when it is actually served.
Sections 13 – 16 on the Food Based Production Report are similar to Sections 11 – 14 in the Nutrient Based Production Report.

You can use this column for recording any special directions or additional information relative to production and preparation.
Enter the quantity of each item that was actually prepared. Include foods that were left over from previous days as well as additional food opened or prepared. Use purchase units (i.e. pounds, #10 cans, etc.).
Enter the number of portions served for non-reimbursable meals.
Record the following in accordance with HACCP and local guidelines.
Enter the actual number of portions left (even if you are discarding the food) in the Amount field.
Enter the actual temperature of the leftover in the oF field.
Enter the date the leftovers need to be used by in the Date to Use field.
You can save your work at any time. When you click Save you will have three choices:
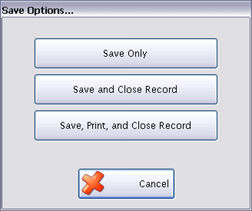
Click Save Only if you have not finished the Production Report.
Click Save and Close Record if you are finished and do not want to print the report.
Click Save, Print, and Close Record if you are finished ready to print the report.
If you have the Menus Control File set to Update Inventory, closing a Production Record will automatically open the Update Inventory Usage screen.
Click  if you want to clear an Open Production Report and start again.
All production data will be deleted and the record will be reset to a Planning status. The menu will be refreshed to match the School Daily Menu.
This option is only available if you are licensed to use Meals Plus Inventory and have Update Inventory checked in the Menus Control File.
When you close a Production Report, the Usage screen will open automatically.

All the ingredients used in the meal will be listed on the Usage screen.
o If an ingredient is associated with an Inventory item and the Menu Costing data is complete, the usage will be calculated automatically. It calculates the amount needed for preparing the day’s menu. Anything less than one secondary unit is rounded up to the next whole secondary unit.
o If the ingredient is not associated with an inventory item, it is highlighted in pink. Usage cannot be updated if there is no corresponding inventory item. If you would like set up an association, go to Menus: Inventory Item.
o If it has an association but the inventory item does not have a secondary weight, it is highlighted in yellow. Usage cannot be calculated unless there is a secondary weight. If you know the usage, you can enter it in the grid. Or you can add the weight under Inventory: Item Maintenance: Bid Price.
Highlight any row in the grid to see the details for that Ingredient/Item.
You can edit the Primary and Secondary quantities if necessary.
Example: If a very small amount of baking soda was used and you don’t want to record a full secondary unit, you can change the quantity to zero.
Click Update to update the Usage in Meals Plus Inventory.
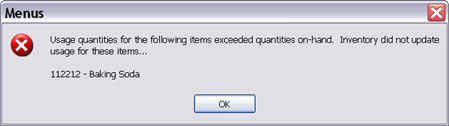
o It will update the Inventory Usage and deduct the quantities from the On Hand at that site. (The inventory On Hand must be have the same packaging information as the Menus Usage screen.)
o If there is not enough of an item on hand, it will skip it and give this message:
o If you would like a printout of the Usage, go to Inventory: Transactions: Usage and select Closed transactions. It will have the same date as the closed Production Report and a comment “Created by Production.”