
This is where you set up your Direct Certification file import.
Select the format of your Direct Cert file from the File Format dropdown list.
Browse to the location of your Direct Cert file in the File Name section. Indicate if your file contains a header row.
A warning message will appear when the user attempts to import a Direct Certification file where an invalid DOB exists: 'Your import data is outside the expected values. Please fix the data in your file and re-import.’
The user can either edit the invalid Birth Dates in the original import file, or skip the column in the File Preview (and remove any Confidence Rankings including it) if invalid data exists.
Set the headings in the grid to correspond to the data in your Direct Cert file. For detailed instructions, please refer to Import Students in System Management documentation.
The confidence rank is a value used to indicate the strength of a potential match between the student in the DC file and the student in the student table.

Field 1 can be either Full SSN or Student Number. A match on either of these is considered a 100% match. This row can be edited and is the only one that can be 100%.
User defined ranking can be set up as additional Confidence Ranking based on a combination of Last Name, First Name, Address1and Birth Date. At least two of the fields must be included in each row.
Example:The user has decided that if all four fields (LastName, FirstName, BirthDate and Address1) all match, it will be considered a 99% match.
If only three or two fields match, it will be assigned a lower ranking.

Select the date to use as the application date from the Application Date dropdown list.
If nothing on the application changes, the application date will not update.
When importing a DC file, if an existing case type is SNAP or SNAP Equiv. and case type does not change, the applications will not update.
If an existing case type is not SNAP or SNAP Equiv., and the new case type is SNAP or SNAP Equiv., the case type and application date will update.
Select an option from the Import Type dropdown list to import different types of files individually. An error will display if no Import Type is selected.
Students already certified for free meals through the application process or directly certified for free meals through other means will not be adversely affected and will remain a status 2.
NOTE: A case type is not needed when Homeless, Migrant, Runaway or Headstart is selected, so that section will not display.
Check the Use Address from DC File box to use the address from the Direct Certification file instead of the student address when creating the application.
NOTE: If there is not an address in the Direct Certification file and the Use Address from DC file is checked, the application will be created with a blank address.
Select a case type from the Use Case Type Mapping dropdown list. A box will appear to add case types.
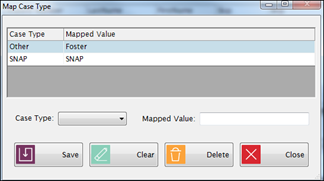
Select a case type from the Case Type dropdown list.
Enter a value in the Mapped Value field.
Or,
Select a case type from the Default to Case Type dropdown list if you want to set a default.
Click Import when you are ready to run the process. If any students can be grouped on an application, the Direct Certification Match screen will appear. If there are no students to be matched for groupings, you will be taken to the Direct Certification: Review Unmatched Students screen.

©2018 EMS LINQ, Inc.
Student Eligibility, revised 7/2018