User Setup
This is where you add and edit User Names,
assign users to groups and assign sites and items. When you open the screen,
all users will be listed.
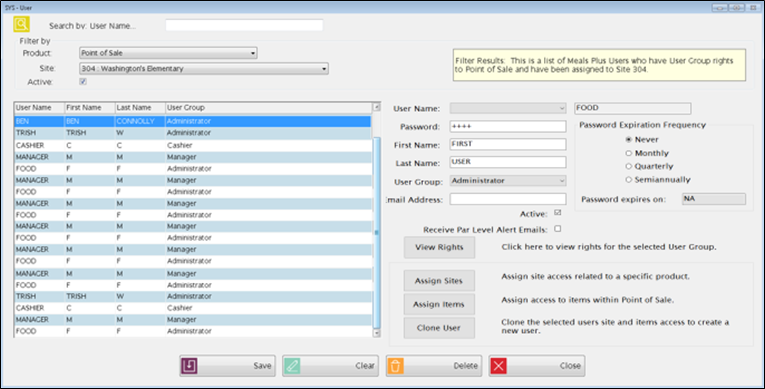
Filter by
-
Select a single Product if you want to
limit the number of users listed from the Product
dropdown list.
-
In Point of Sale,
Inventory, Production and Time Clock,
you can also select a single site from the Site
dropdown list. Student
Eligibility, Menus, Financial and Accountability
are district-wide products so there is no site selection.
-
Check the Active
box to only display user names that are currently in use, by active employees.
- Highlight the user name and uncheck the Active box to “hide” or deactivate an account when it cannot be deleted due to history. That user name will no longer be a valid login.
Left Grid
This displays the current users in Meals Plus.
USER INFORMATION (RIGHT-HAND SECTION)
-
Password
is required and will be the same for all products this user has access
to. Password may be changed as needed. Password will always display
as *’s for privacy purposes. Passwords are encrypted within the database
for added security.
-
First
Name and Last Name
help identify this user. The full name is not shown within the products.
-
Select
an option for setting when a user’s password will expire under the
Password Expiration Frequency
section.
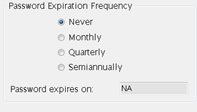
- Select Monthly, Quarterly, or Semiannually if you want to require the user to change the password. It will show the expiration date after the changes are saved.
- If a password is going to expire within ten days, the user will get a message when they log in to the Meals Plus Portal. If they click Yes, they will get a screen where they can reset the password. If it has already expired, they will need to set up a new one. (A User Name is not disabled due to an expired password.)

-
Select
the User Group this user
belongs to. The User Group selected determines the access within each
product this user will have security to.
- To change a user’s rights, assign the User Name to a different User Group.
-
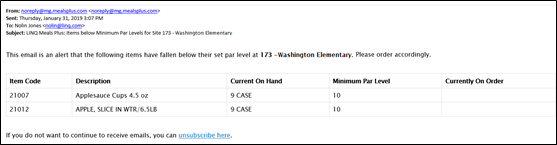
Check the Par Level Alert Emails checkbox, and enter an Email Address field to receive par level alerts via email as part of the Daily Jobs.
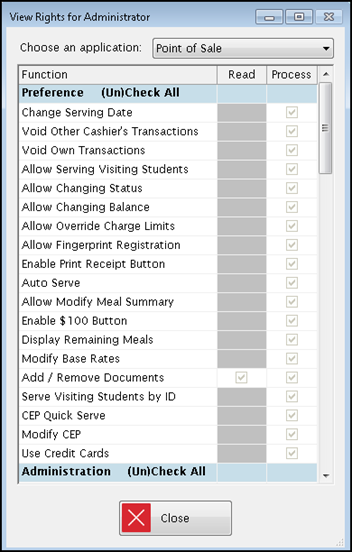
NOTE:Rights
can only be modified under User
Group Setup.
PREFERENCE DESCRIPTIONS
Point of Sale
- Change Serving Date—this allows the user/group to change the serving date on Point of Sale: Serve: Breakfast/Lunch screen.
- Void Other Cashier’s Transactions—this allows the user/group to void other cashier’s transactions in Point of Sale.
- Void Own Transactions—this allows the user/group to void their own transactions in Point of Sale.
- Allow Serving Visiting Students—this allows the user/group to serve visiting students. If this is not enabled, the user logged in will not be able to serve visiting students.
- Allow Changing Status—this allows the user/group to change the status of a student.
- Allow Changing Balance—this allows the user/group to change the status of a student.
- Allow Override Charge Limits—this allows the user/group to override the charge limits of a student in Point of Sale: Administration: Site Setup: Other Configurations.
- Allow Fingerprint Registration—this allows the user/group to register the student’s fingerprint in Point of Sale: Student: Account Setup, Picture/Fingerprint.
- Enable Print Receipt Button—this enables the Print Receipt button on the Serve screen.
- Auto Serve—this allows the user/group to use Auto Serve on Point of Sale: Serve: Breakfast/Lunch.
- Allow Modify Meal Summary—this allows the user/group to modify a meal summary once it has been entered under Point of Sale: Serving Reports: Meal Summary.
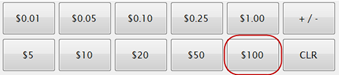
- Enable $100 Button—this will display the $100 button on the Point of Sale: Serve: Breakfast/Lunch screen.

- Display Remaining Meals—this will display the number of Nutrition Code 1 meals that can be bought from the student’s Pending Balance.
- Modify Base Rates—this allows the user/group to modify base rates in POS: Serve: Provision 2 or CEP.
- Add/Remove Documents—this allows the user/group to add and delete documents throughout Point of Sale.
- Serve Visiting Students by ID—this allows the user/group to serve visiting students by their ID and not by looking them up by name.
- CEP Quick Serve—this allows the user/group to serve CEP sites Quick Serve items.
- Modify CEP—this allows the user/group to modify the CEP Setup information in Point of Sale: Serve: Community Eligibility Provision.
- Use Credit Cards—this enables the credit card button the Point of Sale: Serve: Breakfast/Lunch screen.
Student Eligibility
Menus
- Allow Modify Production Column 8—if checked, this allows the user to modify Column 8 of the Production Report.
- Add/Remove Documents—if checked, this allows the user to add and/or remove documents to the Document Cabinet, where available.
- Show Serving Date Delivery Option—if checked, the user will be able to select the option to select the Serving Date equal to the Delivery Date.
- View Inactive Recipes—if checked, this allows the user to view inactive recipes when available.
Inventory
- Modify Invoice Price (Accounts Payable)—if checked, this allows the user to modify the invoice price under Accounts Payable: Accrue Invoice.
- Accrue Invoice w/o PO (Accounts Payable)—if checked, this allows the user to accrue an invoice without a purchase order under Accounts Payable: Accrue Invoice.
- Close Period (Transaction Summary)—if checked, this allows the user to close a period under Transaction Summary.
- Accrue Invoice w/PO (Receiving)—if checked, this allows the user to accrue an invoice with a purchase order under Transactions: Receiving.
- Accrue Invoice w/o PO (Receiving)—if checked, this allows the user to accrue an invoice without a purchase order under Transactions: Receiving.
- Modify Commodity Receiving Price—if checked, this allows the user to modify the price of a Commodity item the district is receiving.
- Modify Purchase Receiving Price—if checked, this allows the user to modify the purchase price of an Inventory item the district is receiving.
- Receipts – Save—if checked, this allows the user to ‘Save Only’ on the Saving a Receipt screen.
- Receipts – Update On Hand, Keep Open—if checked, this allows the user to ‘Save, Update On Hand and Keep Open’ on the Saving a Receipt screen.
- Receipts – Update On Hand, Close—if checked, this allows the user to ‘Save, Update On Hand and Close’ on the Saving a Receipt screen.
- Create Electronic File—if checked, this allows the user to create an electronic file that can be sent to the vendor.
- Create Purchase Orders (NI)—if checked, this allows the user to create non-Inventory purchase orders.
- Physicals – Load On Hand—if checked, this allows the user to count Physical On Hand amounts.
- Close Orders—if checked, this allows the user to close orders under Orders: Manager Orders and Process Orders.
- Delete Orders—if checked, this allows the user to delete orders under Orders: Manager Orders and Process Orders.
- Process Orders—if checked, this gives the user the ability to process orders under Orders: Process Orders.
- Close Physicals—if checked, this allows the user to close physicals under Transactions: Physicals.
- Add/Remove Documents—if checked, this allows the user to add and/or remove documents to the Document Cabinet, where available.
- Assign Batch w/Accrue—if checked, this allows the user to assign invoices to a batch accrued from Receiving.
- Show Serving Date Delivery Option—if checked, the user will be able to select the option to select the Serving Date equal to the Delivery Date.
Production
- Unclose Production Record—if checked, this allows the user to unclose a previously closed production record.
- Allow Modify Production Column 8—if checked, this allows the user to modify Column 8 of the Production Report.
Financial
- Allow Delete Accounts—if checked, this allows the user to delete all accounts for a fiscal year under Utilities.
Time Clock
- Clear PIN—if checked, this allows an administrator to clear an employee’s PIN so it can be reset.
- Undo Approval—if checked, this allows an administrator to undo an approval that has previously been made (i.e. leave, day clock in/out).
POS+
- Change Serving Date—this allows the user/group to change the serving date on POS+: Serve: Supper screen.
- Void Other Cashier’s Transactions—this allows the user/group to void other cashier’s transactions in POS+.
- Void Own Transactions—this allows the user/group to void their own transactions in POS+.
- Allow Serving Visiting Students—this allows the user/group to serve visiting students. If this is not enabled, the user logged in will not be able to serve visiting students.
- Allow Changing Status—this allows the user/group to change the status of a student.
- Allow Changing Balance—this allows the user/group to change the status of a student.
- Allow Override Charge Limits—this allows the user/group to override the charge limits of a student in POS+: Administration: Site Setup: Other Configurations.
- Allow Fingerprint Registration—this allows the user/group to register the student’s fingerprint in POS+: Account Setup, Picture/Fingerprint.
- Enable Print Receipt Button—this enables the Print Receipt button on the Serve screen.
- Auto Serve—this allows the user/group to use Auto Serve on POS+: Serve: Supper.
- Allow Modify Meal Summary—this allows the user to modify or update the Meal Summary after it has been saved.
- Enable $100 Button—this will display the $100 button on the POS+: Serve: Supper screen.
- Display Remaining Meals—this will display the number of Nutrition Code 1 meals that can be bought from the student’s
- Pending Balance—this will display the number of Nutrition Code 1 meals that can be bought from the student’s Pending Balance.
- Modify Base Rates—this allows the user/group to modify base rates in POS: Serve: Provision 2 or CEP.
- Add/Remove Documents—this allows the user/group to add and delete documents throughout POS+.
- Serve Visiting Students by ID— this allows the user/group to serve visiting students by their ID and not by looking them up by name.
- Use Credit Cards—this enables the credit card button the POS+: Serve: Supper screen.
SITE ACCESS

-
Check the Inventory
and Production Records
sites the user will need access to. They do not have to be the same.
In the example shown, the user has Inventory rights to all sites,
including the warehouse, but only handles Production Records for two
sites.
-
Check only the Time
Clock sites where the user acts as a Time
Clock Administrator. They do not need rights in order to clock
in and out.
-
Click
the  button to assign meal items to POS users. This determines
which items the user will have available when serving.
button to assign meal items to POS users. This determines
which items the user will have available when serving.
- This does not give them rights to change the items.
- In order to change item descriptions or prices, they would need to be in a User Group that has Process rights to Item Setup.
Clone User
Clone User
can be used to set up multiple users that are the same.

-
Select
the user you wish to copy from the left grid and click Clone
User. The Clone User form will open with User
Group defaulted to match the original user.
-
Enter
a new User Name in the User
Name field.
-
Enter
a Password in the Password field.
-
Enter
a First Name in the First Name field.
-
Enter
a Last Name in the Last Name field.
-
Select
Never, Monthly, Quarterly
and Semiannually from
the Password Expiration Frequency
list, if desired.
-
Enter
a date in the Passwordexpires on if an expiration
frequency was assigned to the password.
-
Click Clone.
The new user has been easily added.
-
A
User can be deleted by highlighting their name in the grid and clicking
Delete.
- If there is any history associated with a user name, the user cannot be deleted.
- However, you can “hide” the user name so it cannot be used. Highlight the user name and uncheck the Active box. That user name will no longer be a valid login.
©2019
EMS LINQ, Inc.
www.mealsplus.com
SYS Version 9,
revised 2/2019
 button
to display the Rightsfor the selected user.
Rights can only be modified under User
Group Setup.
button
to display the Rightsfor the selected user.
Rights can only be modified under User
Group Setup.
 button
to assign site access to a specific user. Users must have at least
one (1) site assigned to them. Site
Access is granted by product.
button
to assign site access to a specific user. Users must have at least
one (1) site assigned to them. Site
Access is granted by product.