The Vendor file includes all the vendor information needed for ordering and receiving inventory and updating the General Ledger for Purchase Orders and Invoices.
At least one vendor is required before you set up Inventory Items.
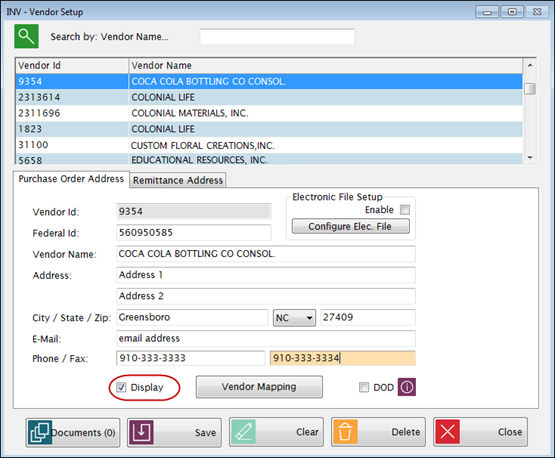
Enter a unique Vendor ID (up to 20 characters) for each vendor in the Vendor ID text field.
Enter a vendor name in the Vendor Name text field.
Enter the vendor’s Federal Id in the Federal Id text field, if applicable.
Enter the Address and City/State/Zip information of the Purchase Order Address in the appropriate fields.
o This will be printed on Purchase Orders.
Enter the vendor’s E-Mail and Phone/Fax numbers in the appropriate fields, if desired. They are for reference only.
Check Display if you want this vendor to be available in the Vendor dropdowns for Item Maintenance, Orders, Transactions, and Invoices. Uncheck the box if this is a vendor that is no longer used and you do not want it listed.
o If you uncheck it, the vendor will be removed from the list but not deleted; you can set it back to display at any time.
If the
Department of Defense (DoD) accounting entries need to be created,
check
the DOD  box.
box.
o Notes on the DoD Program:
§ Creating a separate DoD Vendor is optional but recommended.
§ User will need to set up a DoD Category in Account Category and Inventory Accounts.
§ When receiving from a DoD vendor, you should receive the items using the Transactions: Receive Inventory screen, and not the Transactions: Receive Commodity screen. Receipt values will be posted twice if the incorrect screen is used.
§ When closing a Transaction Summary, it will create an automatic AJE for the Category expense code and Commodity Revenue for inventory received from the DoD Vendor.
This information is needed only if you will be sending orders electronically. This is accessed from the Vendor Setup: Purchase Order Address screen.
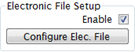
Check Enable and click Configure Elec. File to open the Electronic File Setup.
You will see two tabs: Electronic File Setup and Vendor’s Customer Info.

Electronic File Format tab
Select Fixed Length, CSV, XML, US Food or SYSCO from the File Format section. (US Food is a pre-defined format for US Foodservice. US Food users will also need to fill in the Vendor’s Customer Info tab.)
Click Browse to select the location where you want to save the file for the Export File Path.
Check the Export (Y/N) box next to each field that you want to export. If you select Customer/Contract ID, you will need to enter the Customer ID information on the Vendor’s Customer Info tab.
If you are using Fixed Length format, you will need to specify the lengths in the Field Length field. CSV and XML formats do not require field length.
You can change the Field Sequence by highlighting a field and clicking the up and down arrows.

Vendor’s Customer Info tab
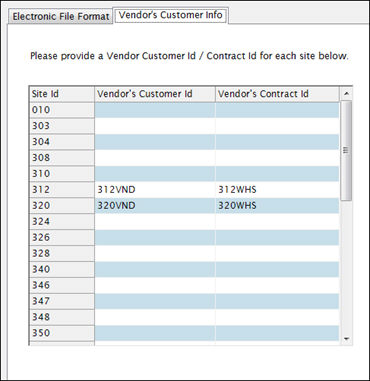
Enter the Address and City/State/Zip information, or click Same as Purchase Order to fill it in automatically.
This will be used with Invoice Accrual and it will print on the checks when they are printed in the general ledger.
![]() If
you are going to map the Vendor to the general ledger, you can leave the
address information blank and synchronize the address info when you save
the mapping.
If
you are going to map the Vendor to the general ledger, you can leave the
address information blank and synchronize the address info when you save
the mapping.
This determines which general ledger vendor is used when Meals Plus Inventory updates the LINQ or Sunpac general ledger for Purchase Orders or Invoices.
Click Vendor Mapping to open the Vendor Mapping screen.
Vendor Mapping is used to link Meals Plus Inventory vendors to general ledger Vendors.
This displays currently mapped vendors. To delete a mapping, click Remove.
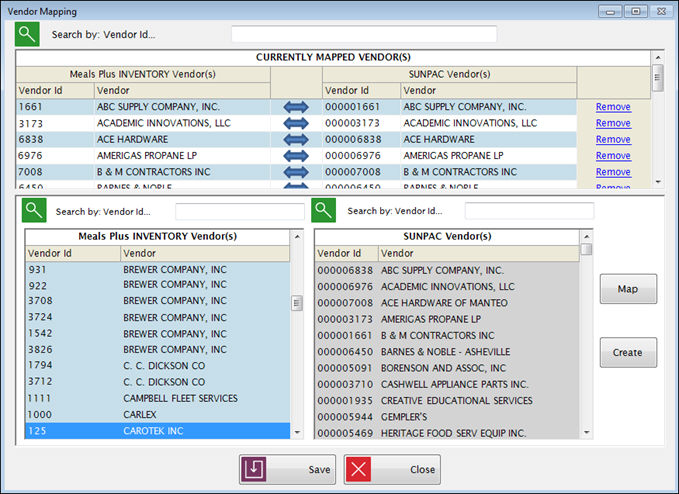
The lower left grid shows all the vendors in Meals Plus Inventory; the lower right grid shows the general ledger vendors.
A gray background indicates that the vendor is already mapped; however, vendors on the Meals Plus Inventory Vendors can be mapped multiple times to LINQ Vendors. If you need to add a mapping, select a mapped vendor (Meals Plus side), then select a different vendor in the LINQ grid, and click Map.
Set up a new mapping
Select one vendor from each side and click Map.
o LINQ Users: If a general ledger vendor has only one active location it will select that location automatically. If there are multiple active locations, you will get a pop-up to select one location for mapping.
When you click Save, it will update the MealsPlus vendor name and all the address information to match the general ledger name and addresses.
The Document Cabinet is available for many functions within Inventory. With this, you are able to add documents to the record and the information is one central location.
Click
 to
add documents to a vendor.
to
add documents to a vendor.
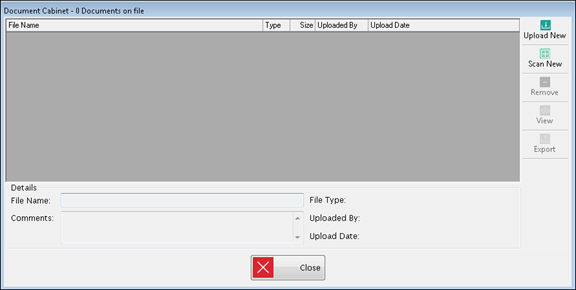
Upper Grid
This displays all the documents currently attached to this record.
Select any record to display more details below. Any comments along with whom and when the document was added to this record will display.
Buttons
Click Upload New to add a new document that has been saved on your computer.
o File Name can be changed and Comments added as needed.
Click Scan New to scan and add a new document directly to this application.

o Select a scanner from the list of available scanners in the Scanner Devices box.
o Uncheck the Hide Scanner Window box to see more advance options for your scanner.
o Use the options in Image Processing to adjust the quality of the scan.
o Click Scan from Platen Glass or Scan from Automatic Document Feeder depending on the type of scanner you are using. When the scan is complete, a preview of the document will show on the right side if the Preview box is checked.
o Click Finish when you are ready to attach the scanned document. The document will be saved in the document cabinet as a PDF.
To remove a document, highlight the document in the grid and click Remove.
Click View to view an existing document. The document will open in read-only status.
Click Export to export a document out of LINQ. A browse box to select where to save the document will appear. Choose location to export the document and Save.
Details Section
This section displays the File Name and type, when it was uploaded and by whom.
Enter any comments about the document in the Comments text box.