Single Central Kitchen and Multiple Warehouses
The Central Kitchen prepares some food that can be ordered by sites/schools but there are also Multiple Warehouses that store food and supplies that schools can order from. This setup is similar to 'Single Central Kitchen and Single Warehouse’ setup--the differences will be shown in red.
STEP 1:
Go to the Administration: Site Setup screen to set up your Kitchen.
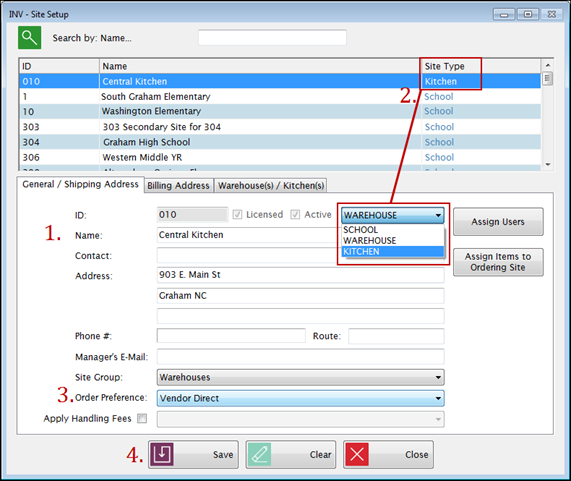
- On the General/Shipping Address tab, enter theCentral Kitchen information (or enter the name your district uses) in the appropriate fields.
- Select Kitchen from the Site Type dropdown list.
- Select Vendor Direct from Order Preference since the Central Kitchen will be the vendor the sites/schools for items 'prepared in-house'.
- Click Save.
STEP 2:
Repeat this process to set up your warehouse.
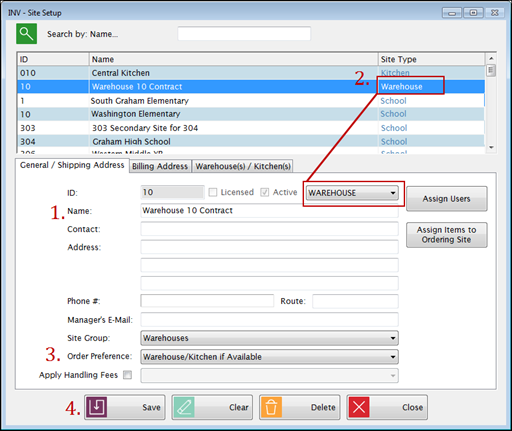
- On the General/Shipping Address tab, enter theWarehouse information (or enter the name your district uses) in the appropriate fields.
- Select Warehouse from the Site Type dropdown list.
- Select Vendor Direct from Order Preference so items are ordered directly from vendors and stored in the warehouse before being ordered from the sites.
- Click Save.
-
Repeat to add each additional Warehouse your district has in Site Setup.
STEP 3:
Next, also in Site Setup, click the Warehouse(s)/Kitchen(s) tab to assign your Central Kitchen to each site so they can order from it.
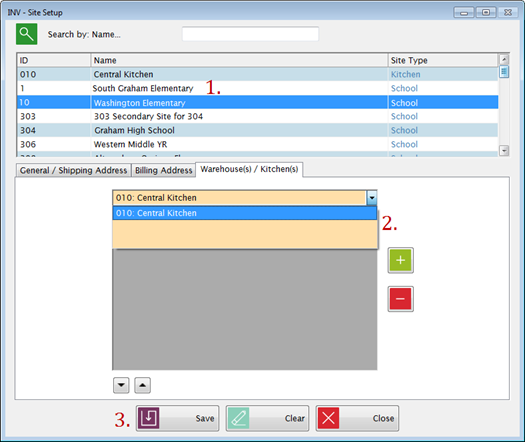
- Highlight a site/school from the upper grid, and then
- Click the green plus sign to add Central Kitchen to the lower grid.
- This is giving the site the ability/rights to order from the Central Kitchen.
- Click Save.
- Repeat this for each site that has the Central Kitchen assigned to it for ordering.
STEP 4:
On the same screen, assign your Warehouse(s) to each site that can order Inventory Items from it.
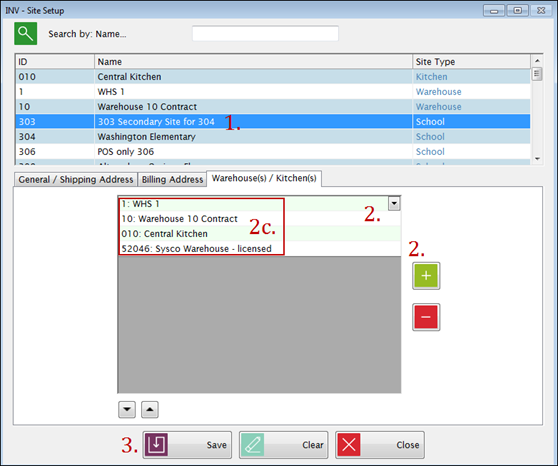
- Highlight a site/school from the upper grid.
- Click the green plus sign and click the down arrow to select a Warehouse to add it to the lower grid.
- This is giving the site the ability/rights to order from that Warehouse.
- Repeat this step if the site can order from multiple warehouses.
- The order the Warehouses and Central Kitchen display in this grid is very important. When ordering, Inventory items will be ordered from the first warehouse/kitchen on the list. If an item (or items) is not available, a WO will be created for the next warehouse/kitchen and so on. If an item (or items) is not available anywhere, then either a PO or backorder will be created depending on the order preference for the site.
- Click Save.
- Repeat this for each site that can order items from Warehouses.
STEP 5:
If the Central Kitchen prepares food and schools order a finished product, i.e. spaghetti, add a vendor name that correlates with your Kitchen's name for items prepared in-house to Vendor Setup.
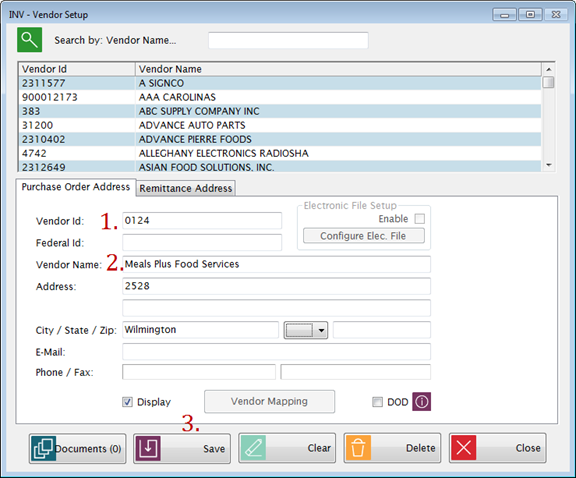
- Enter a Vendor ID in the correct field.
- Enter a Vendor Name.In this example, Meals Plus Food Services was entered into the Vendor Name field.
- Click Save to save the information.
STEP 6:
Set up your Inventory Items to be prepared in-house in Item Maintenance.
- Click Create New and begin on the Details tab by entering the required information.
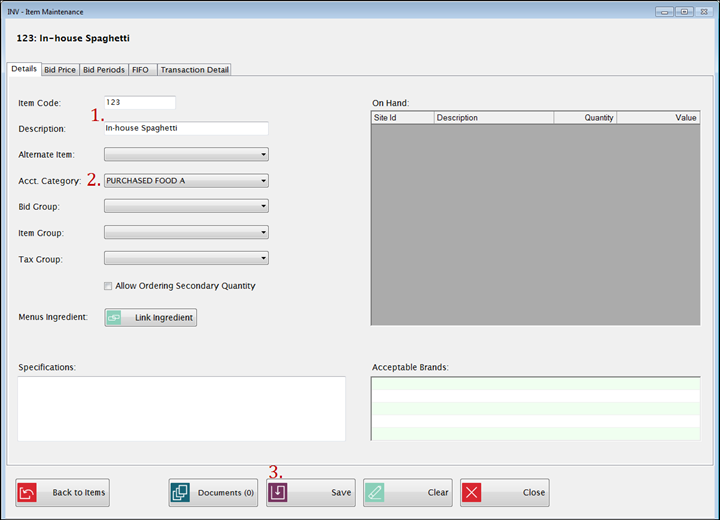
- Enter an Item Code and a Description.
- The Description should be something easily identifiable as prepared in-house; this scenario uses the 'In-house' before the item description, so 'In-house Spaghetti'.
- Select an Acct. Category from the dropdown list.
- Click Save.
These are the *required* fields, you can enter more fields if you would like.
Next, go to the Bid Price Tab.
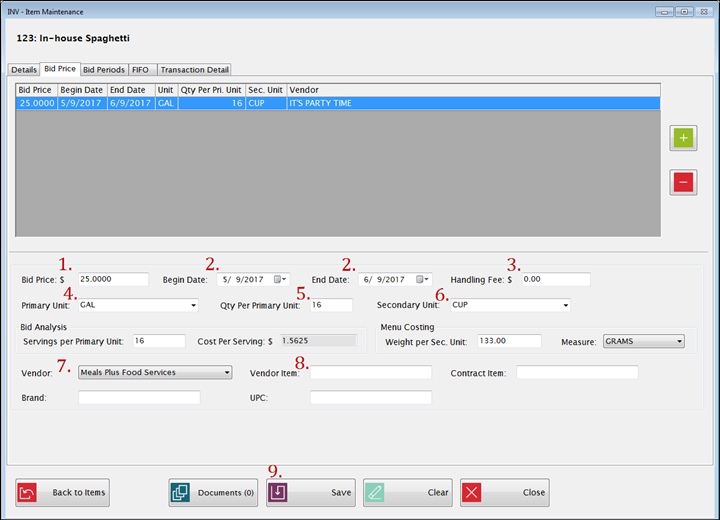
- Enter the Bid Price: $ in the field of the price the vendor (Central Kitchen) will charge for one Primary Unit of this item.
- Enter the dates this price is effective in the Begin/End Dates fields.
- The Begin Date for a Bid Period cannot be before the End Date of the previous period.
- Items can only be ordered for delivery on dates that have valid bid prices.
- Leave the Handling Fee field blank since it does not apply here.
- Select the standard packaging for the product as ordered from the vendor from the Primary Unit dropdown list. Examples: Case, Box, Carton.
- Enter the number of Secondary Units that are contained within one Primary Unit in the Qty Per Primary Unit text field.
- Select how the product is packaged within the Primary Unit from the Secondary Unit dropdown list. The Secondary Unit can be used when recording Usage, Adjustments and Physical counts. You can also order by Secondary Unit if the box is checked to allow it. Example: #10 Can, Each, LB (pound).
- If Primary or Secondary Unit description is changed, it will update existing data automatically.
- Select a the vendor name you created for In-House items from the Vendor dropdown list. This is *required*.
- Enter the In-HouseVendor’s ID code that is used for this item for regular Purchase Order in the Vendor Item text field. This will be printed on Purchase Orders.
- The Vendor Item code must be entered here to display on an exported Purchase Order; if it is entered on the PO and not here, the code will not export.
- Click Save.
BID ANALYSIS
This section is optional. It is used for calculating the Cost Per Serving in Bid Analysis.
MENU COSTING
This information is used only if you are also using Meals PlusMenus and Update Inventory is checked in Menus: Control File.
For more information on Bid Analysis and Menu Costing, click here.
STEP 7:
The final step is in Central Kitchen: Settings.
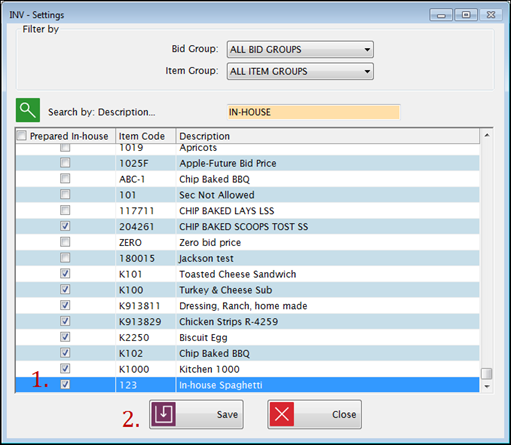
Find the Inventory Items that were Prepared In-House.
- Click the Prepared In-House checkbox next to the appropriate Inventory Items in the grid.
- Click Save.
Your district is set up and once you complete your Kitchen Fulfillment, you can start ordering from your Central Kitchen and Warehouses!