This is used for setting up the accounts to be used when Meals Plus Inventory updates the General Ledger.
![]() Before you set up Inventory Accounts, you will need
to run Import Account Info from
Meals Plus Financial:
Utilities Menu.
Before you set up Inventory Accounts, you will need
to run Import Account Info from
Meals Plus Financial:
Utilities Menu.
Categories are set up under Account Category Setup.
o A Non-Inventory category will be set up automatically and is used to set the default accounts to be used with Non-Inventory Purchase Orders and Invoices.
§ Accounts Payable account: Must be set up for each site where you will accrue Non-Inventory invoices. It cannot be edited on the Invoice Accrual screen. Non-Inventory invoices are those that are accrued under Accounts Payable menu and not associated with an Inventory PO or Receipt.
§ Encumbrance account: Setup is recommended but not required for Non-Inventory POs. It will be used as the default when creating Non-Inventory POs.
§ Expense account: If entered, it will be used as the default account for Non-Inventory POs and Invoices but can be edited.
Inventory Items are linked to Account Categories in Item Maintenance.
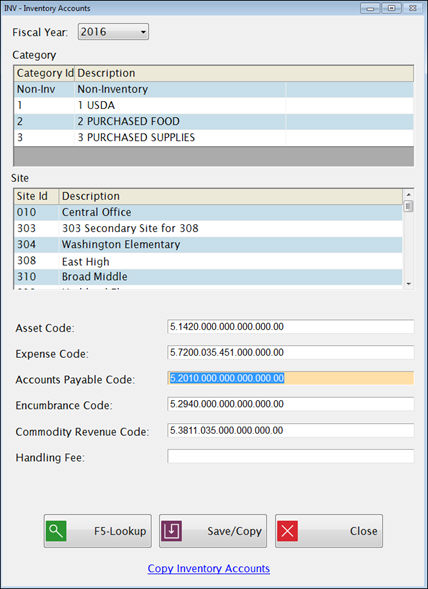
Select the Fiscal Year from the dropdown list.
Select a Category from the Category grid.
Select a Site from the Site grid.
Then enter or select the account codes to be used for that site.
The list of available accounts is based on the accounts that were imported in Meals Plus Financial: Utilities: Import Account Info. You can refresh the account list by running the import again.
Note for Accounts Payable and Encumbrance Code: If there are multiple accounts available that could be used, we recommend that you select the same account that is used in the general ledger as the offset account.
Example: If there are two valid Encumbrance codes, 5.2940.000 and 5.2940.035, use the one that is used as the offset for the selected expense code in the general ledger. Otherwise the general ledger inquiry screens may not show the Meals Plus Encumbrance transactions correctly.
If you click F5-Lookup you will get a pop-up screen where you can search by Account Number or Description; click on the column heading to select the one you want to use.
Enter the beginning of the Account Number or Description you are looking for. It will automatically go to the closest match. You can use the scroll bar browse the list. When the correct account is highlighted, double-click to select it.
When you save the accounts for one site, it will ask if you want to copy these account numbers to other Inventory sites:
If you click No, it will only save the settings for the current site.
o Use this option if you are working on a site that has special settings, such as a warehouse.
If you click Yes, you will get a screen where you can select one or more sites.
o Check the Sites that you want to copy accounts to.
o If you get this message, and click Yes, it will copy ALL the accounts (including blanks) from the site you just saved to the selected sites.

If you are using an Account Structure with a defined position for the Site ID (this includes all LINQ and Sunpac General Ledger users):
o If the Site ID is in the standard position in the “copy from” account code, it will use the new Site Id in the new Site’s account code.
o If 000 is in the Site position, it will use 000 in the new Site’s account code.
If some of the account codes needed for the copy do not exist or are not usable, you will get a message. Click Yes on the message to get a list of the missing accounts.

To correct a missing account:
o If it is acceptable for accounting purposes, you can select a different account that is valid in the Financial Accounts table and save it.
Or,
o If a required account does not exist, go to the general ledger and add it, re-run the Financial Account Import to refresh the Meals Plus data, and then enter and save the account in this screen.